The Big Picture
Start using Symfony2 in 10 minutes! This chapter will walk you through some of the most important concepts behind Symfony2 and explain how you can get started quickly by showing you a simple project in action.
If you’ve used a web framework before, you should feel right at home with Symfony2. If not, welcome to a whole new way of developing web applications!
Tip
Want to learn why and when you need to use a framework? Read the “Symfony in 5 minutes” document.
Downloading Symfony2
First, check that you have installed and configured a Web server (such as Apache) with PHP 5.3.2 or higher.
Ready? Start by downloading the “Symfony2 Standard Edition”, a Symfony distribution that is preconfigured for the most common use cases and also contains some code that demonstrates how to use Symfony2 (get the archive with the vendors included to get started even faster).
After unpacking the archive under your web server root directory, you should
have a Symfony/ directory that looks like this:
www/ <- your web root directory
    Symfony/ <- the unpacked archive
        app/
            cache/
            config/
            logs/
            Resources/
        bin/
        src/
            Acme/
                DemoBundle/
                    Controller/
                    Resources/
                    ...
        vendor/
            symfony/
            doctrine/
            ...
        web/
            app.php
            ...
Note
If you downloaded the Standard Edition without vendors, simply run the following command to download all of the vendor libraries:
php bin/vendors install
Checking the Configuration
Symfony2 comes with a visual server configuration tester to help avoid some headaches that come from Web server or PHP misconfiguration. Use the following URL to see the diagnostics for your machine:
http://localhost/Symfony/web/config.php
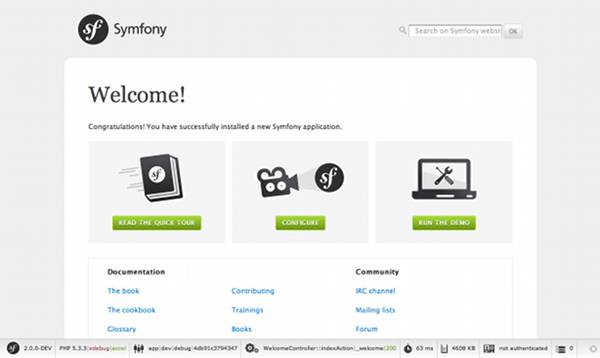
If there are any outstanding issues listed, correct them. You might also tweak your configuration by following any given recommendations. When everything is fine, click on “Bypass configuration and go to the Welcome page” to request your first “real” Symfony2 webpage:
http://localhost/Symfony/web/app_dev.php/
Symfony2 should welcome and congratulate you for your hard work so far!
Understanding the Fundamentals
One of the main goals of a framework is to ensure Separation of Concerns. This keeps your code organized and allows your application to evolve easily over time by avoiding the mixing of database calls, HTML tags, and business logic in the same script. To achieve this goal with Symfony, you’ll first need to learn a few fundamental concepts and terms.
Tip
Want proof that using a framework is better than mixing everything in the same script? Read the “Symfony2 versus Flat PHP” chapter of the book.
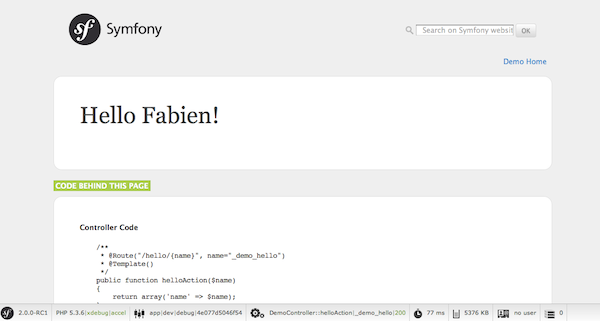
The distribution comes with some sample code that you can use to learn more about the main Symfony2 concepts. Go to the following URL to be greeted by Symfony2 (replace Fabien with your first name):
http://localhost/Symfony/web/app_dev.php/demo/hello/Fabien
What’s going on here? Let’s dissect the URL:
app_dev.php: This is a front controller. It is the unique entry point of the application and it responds to all user requests;/demo/hello/Fabien: This is the virtual path to the resource the user wants to access.
Your responsibility as a developer is to write the code that maps the user’s
request (/demo/hello/Fabien) to the resource associated with it
(the Hello Fabien! HTML page).
Routing
Symfony2 routes the request to the code that handles it by trying to match the
requested URL against some configured patterns. By default, these patterns
(called routes) are defined in the app/config/routing.yml configuration
file. When you’re in the dev environment -
indicated by the app_**dev**.php front controller - the app/config/routing_dev.yml
configuration file is also loaded. In the Standard Edition, the routes to
these “demo” pages are placed in that file:
# app/config/routing_dev.yml
_welcome:
    pattern:  /
    defaults: { _controller: AcmeDemoBundle:Welcome:index }

_demo:
    resource: "@AcmeDemoBundle/Controller/DemoController.php"
    type:     annotation
    prefix:   /demo

# ...
The first three lines (after the comment) define the code that is executed
when the user requests the “/” resource (i.e. the welcome page you saw
earlier). When requested, the AcmeDemoBundle:Welcome:index controller
will be executed. In the next section, you’ll learn exactly what that means.
Tip
The Symfony2 Standard Edition uses YAML for its configuration files, but Symfony2 also supports XML, PHP, and annotations natively. The different formats are compatible and may be used interchangeably within an application. Also, the performance of your application does not depend on the configuration format you choose as everything is cached on the very first request.
Controllers
A controller is a fancy name for a PHP function or method that handles incoming
requests and returns responses (often HTML code). Instead of using the
PHP global variables and functions (like $_GET or header()) to manage
these HTTP messages, Symfony uses objects: Symfony\Component\HttpFoundation\Request
and Symfony\Component\HttpFoundation\Response. The simplest possible
controller might create the response by hand, based on the request:
use Symfony\Component\HttpFoundation\Response;

$name = $request->query->get('name');

return new Response('Hello '.$name, 200, array('Content-Type' => 'text/plain'));
Note
Symfony2 embraces the HTTP Specification, which are the rules that govern all communication on the Web. Read the “Symfony2 and HTTP Fundamentals” chapter of the book to learn more about this and the added power that this brings.
Symfony2 chooses the controller based on the _controller value from the
routing configuration: AcmeDemoBundle:Welcome:index. This string is the
controller logical name, and it references the indexAction method from
the Acme\DemoBundle\Controller\WelcomeController class:
// src/Acme/DemoBundle/Controller/WelcomeController.php
namespace Acme\DemoBundle\Controller;

use Symfony\Bundle\FrameworkBundle\Controller\Controller;

class WelcomeController extends Controller
{
    public function indexAction()
    {
        return $this->render('AcmeDemoBundle:Welcome:index.html.twig');
    }
}
Tip
You could have used the full class and method name -
Acme\DemoBundle\Controller\WelcomeController::indexAction - for the
_controller value. But if you follow some simple conventions, the
logical name is shorter and allows for more flexibility.
The WelcomeController class extends the built-in Controller class,
which provides useful shortcut methods, like the
:method:`Symfony\\Bundle\\FrameworkBundle\\Controller\\Controller::render`
method that loads and renders a template
(AcmeDemoBundle:Welcome:index.html.twig). The returned value is a Response
object populated with the rendered content. So, if the needs arise, the
Response can be tweaked before it is sent to the browser:
public function indexAction()
{
    $response = $this->render('AcmeDemoBundle:Welcome:index.txt.twig');
    $response->headers->set('Content-Type', 'text/plain');

    return $response;
}
No matter how you do it, the end goal of your controller is always to return
the Response object that should be delivered back to the user. This Response
object can be populated with HTML code, represent a client redirect, or even
return the contents of a JPG image with a Content-Type header of image/jpg.
Tip
Extending the Controller base class is optional. As a matter of fact,
a controller can be a plain PHP function or even a PHP closure.
“The Controller” chapter of the book tells you
everything about Symfony2 controllers.
The template name, AcmeDemoBundle:Welcome:index.html.twig, is the template
logical name and it references the
Resources/views/Welcome/index.html.twig file inside the AcmeDemoBundle
(located at src/Acme/DemoBundle). The bundles section below will explain
why this is useful.
Now, take a look at the routing configuration again and find the _demo
key:
# app/config/routing_dev.yml
_demo:
    resource: "@AcmeDemoBundle/Controller/DemoController.php"
    type:     annotation
    prefix:   /demo
Symfony2 can read/import the routing information from different files written
in YAML, XML, PHP, or even embedded in PHP annotations. Here, the file’s
logical name is @AcmeDemoBundle/Controller/DemoController.php and refers
to the src/Acme/DemoBundle/Controller/DemoController.php file. In this
file, routes are defined as annotations on action methods:
// src/Acme/DemoBundle/Controller/DemoController.php
use Sensio\Bundle\FrameworkExtraBundle\Configuration\Route;
use Sensio\Bundle\FrameworkExtraBundle\Configuration\Template;

class DemoController extends Controller
{
    /**
     * @Route("/hello/{name}", name="_demo_hello")
     * @Template()
     */
    public function helloAction($name)
    {
        return array('name' => $name);
    }

    // ...
}
The @Route() annotation defines a new route with a pattern of
/hello/{name} that executes the helloAction method when matched. A
string enclosed in curly brackets like {name} is called a placeholder. As
you can see, its value can be retrieved through the $name method argument.
Note
Even if annotations are not natively supported by PHP, you use them extensively in Symfony2 as a convenient way to configure the framework behavior and keep the configuration next to the code.
If you take a closer look at the controller code, you can see that instead of
rendering a template and returning a Response object like before, it
just returns an array of parameters. The @Template() annotation tells
Symfony to render the template for you, passing in each variable of the array
to the template. The name of the template that’s rendered follows the name
of the controller. So, in this example, the AcmeDemoBundle:Demo:hello.html.twig
template is rendered (located at src/Acme/DemoBundle/Resources/views/Demo/hello.html.twig).
Tip
The @Route() and @Template() annotations are more powerful than
the simple examples shown in this tutorial. Learn more about “annotations
in controllers” in the official documentation.
Templates
The controller renders the
src/Acme/DemoBundle/Resources/views/Demo/hello.html.twig template (or
AcmeDemoBundle:Demo:hello.html.twig if you use the logical name):
{# src/Acme/DemoBundle/Resources/views/Demo/hello.html.twig #}
{% extends "AcmeDemoBundle::layout.html.twig" %}

{% block title "Hello " ~ name %}

{% block content %}
    <h1>Hello {{ name }}!</h1>
{% endblock %}
By default, Symfony2 uses Twig as its template engine but you can also use traditional PHP templates if you choose. The next chapter will introduce how templates work in Symfony2.
Bundles
You might have wondered why the bundle word is used in many names we
have seen so far. All the code you write for your application is organized in
bundles. In Symfony2 speak, a bundle is a structured set of files (PHP files,
stylesheets, JavaScripts, images, ...) that implements a single feature (a
blog, a forum, ...) and which can be easily shared with other developers. As
of now, we have manipulated one bundle, AcmeDemoBundle. You will learn
more about bundles in the last chapter of this tutorial.
Working with Environments
Now that you have a better understanding of how Symfony2 works, take a closer look at the bottom of any Symfony2 rendered page. You should notice a small bar with the Symfony2 logo. This is called the “Web Debug Toolbar” and it is the developer’s best friend.
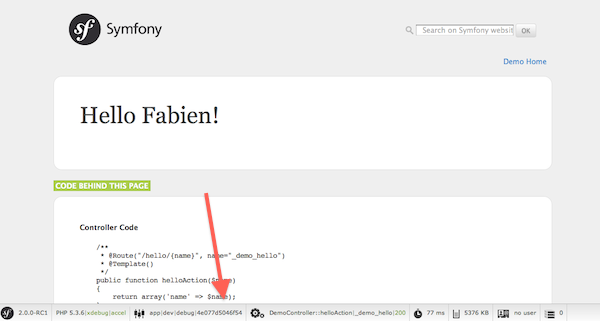
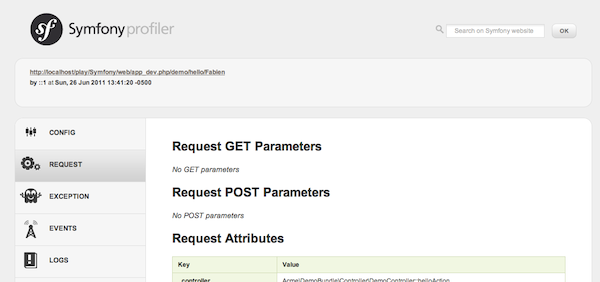
But what you see initially is only the tip of the iceberg; click on the weird hexadecimal number to reveal yet another very useful Symfony2 debugging tool: the profiler.
Of course, you won’t want to show these tools when you deploy your application
to production. That’s why you will find another front controller in the
web/ directory (app.php), which is optimized for the production environment:
http://localhost/Symfony/web/app.php/demo/hello/Fabien
And if you use Apache with mod_rewrite enabled, you can even omit the
app.php part of the URL:
http://localhost/Symfony/web/demo/hello/Fabien
Last but not least, on the production servers, you should point your web root
directory to the web/ directory to secure your installation and have an
even better looking URL:
http://localhost/demo/hello/Fabien
Note
Note that the three URLs above are provided here only as examples of how a URL looks like when the production front controller is used (with or without mod_rewrite). If you actually try them in an out of the box installation of Symfony Standard Edition you will get a 404 error as AcmeDemoBundle is enabled only in dev environment and its routes imported in app/config/routing_dev.yml.
To make you application respond faster, Symfony2 maintains a cache under the
app/cache/ directory. In the development environment (app_dev.php),
this cache is flushed automatically whenever you make changes to any code or
configuration. But that’s not the case in the production environment
(app.php) where performance is key. That’s why you should always use
the development environment when developing your application.
Different environments of a given application differ only in their configuration. In fact, a configuration can inherit from another one:
# app/config/config_dev.yml
imports:
    - { resource: config.yml }

web_profiler:
    toolbar: true
    intercept_redirects: false
The dev environment (which loads the config_dev.yml configuration file)
imports the global config.yml file and then modifies it by, in this example,
enabling the web debug toolbar.
Final Thoughts
Congratulations! You’ve had your first taste of Symfony2 code. That wasn’t so hard, was it? There’s a lot more to explore, but you should already see how Symfony2 makes it really easy to implement web sites better and faster. If you are eager to learn more about Symfony2, dive into the next section: “The View”.