Forms
Dealing with HTML forms is one of the most common - and challenging - tasks for a web developer. Symfony2 integrates a Form component that makes dealing with forms easy. In this chapter, you’ll build a complex form from the ground-up, learning the most important features of the form library along the way.
Note
The Symfony form component is a standalone library that can be used outside of Symfony2 projects. For more information, see the Symfony2 Form Component on Github.
Creating a Simple Form
Suppose you’re building a simple todo list application that will need to
display “tasks”. Because your users will need to edit and create tasks, you’re
going to need to build a form. But before you begin, first focus on the generic
Task class that represents and stores the data for a single task:
// src/Acme/TaskBundle/Entity/Task.php
namespace Acme\TaskBundle\Entity;

class Task
{
    protected $task;

    protected $dueDate;

    public function getTask()
    {
        return $this->task;
    }
    public function setTask($task)
    {
        $this->task = $task;
    }

    public function getDueDate()
    {
        return $this->dueDate;
    }
    public function setDueDate(\DateTime $dueDate = null)
    {
        $this->dueDate = $dueDate;
    }
}
Note
If you’re coding along with this example, create the AcmeTaskBundle
first by running the following command (and accepting all of the default
options):
php app/console generate:bundle --namespace=Acme/TaskBundle
This class is a “plain-old-PHP-object” because, so far, it has nothing
to do with Symfony or any other library. It’s quite simply a normal PHP object
that directly solves a problem inside your application (i.e. the need to
represent a task in your application). Of course, by the end of this chapter,
you’ll be able to submit data to a Task instance (via an HTML form), validate
its data, and persist it to the database.
Building the Form
Now that you’ve created a Task class, the next step is to create and
render the actual HTML form. In Symfony2, this is done by building a form
object and then rendering it in a template. For now, this can all be done
from inside a controller:
// src/Acme/TaskBundle/Controller/DefaultController.php
namespace Acme\TaskBundle\Controller;

use Symfony\Bundle\FrameworkBundle\Controller\Controller;
use Acme\TaskBundle\Entity\Task;
use Symfony\Component\HttpFoundation\Request;

class DefaultController extends Controller
{
    public function newAction(Request $request)
    {
        // create a task and give it some dummy data for this example
        $task = new Task();
        $task->setTask('Write a blog post');
        $task->setDueDate(new \DateTime('tomorrow'));

        $form = $this->createFormBuilder($task)
            ->add('task', 'text')
            ->add('dueDate', 'date')
            ->getForm();

        return $this->render('AcmeTaskBundle:Default:new.html.twig', array(
            'form' => $form->createView(),
        ));
    }
}
Tip
This example shows you how to build your form directly in the controller. Later, in the “Creating Form Classes” section, you’ll learn how to build your form in a standalone class, which is recommended as your form becomes reusable.
Creating a form requires relatively little code because Symfony2 form objects are built with a “form builder”. The form builder’s purpose is to allow you to write simple form “recipes”, and have it do all the heavy-lifting of actually building the form.
In this example, you’ve added two fields to your form - task and dueDate -
corresponding to the task and dueDate properties of the Task class.
You’ve also assigned each a “type” (e.g. text, date), which, among
other things, determines which HTML form tag(s) is rendered for that field.
Symfony2 comes with many built-in types that will be discussed shortly (see Built-in Field Types).
Rendering the Form
Now that the form has been created, the next step is to render it. This is
done by passing a special form “view” object to your template (notice the
$form->createView() in the controller above) and using a set of form
helper functions:
- Twig
{# src/Acme/TaskBundle/Resources/views/Default/new.html.twig #}

<form action="{{ path('task_new') }}" method="post" {{ form_enctype(form) }}>
    {{ form_widget(form) }}

    <input type="submit" />
</form>
- PHP
<!-- src/Acme/TaskBundle/Resources/views/Default/new.html.php -->

<form action="<?php echo $view['router']->generate('task_new') ?>" method="post" <?php echo $view['form']->enctype($form) ?> >
    <?php echo $view['form']->widget($form) ?>

    <input type="submit" />
</form>
Note
This example assumes that you’ve created a route called task_new
that points to the AcmeTaskBundle:Default:new controller that
was created earlier.
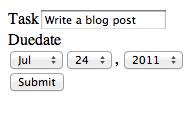
That’s it! By printing form_widget(form), each field in the form is
rendered, along with a label and error message (if there is one). As easy
as this is, it’s not very flexible (yet). Usually, you’ll want to render each
form field individually so you can control how the form looks. You’ll learn how
to do that in the “Rendering a Form in a Template” section.
Before moving on, notice how the rendered task input field has the value
of the task property from the $task object (i.e. “Write a blog post”).
This is the first job of a form: to take data from an object and translate
it into a format that’s suitable for being rendered in an HTML form.
Tip
The form system is smart enough to access the value of the protected
task property via the getTask() and setTask() methods on the
Task class. Unless a property is public, it must have a “getter” and
“setter” method so that the form component can get and put data onto the
property. For a Boolean property, you can use an “isser” method (e.g.
isPublished()) instead of a getter (e.g. getPublished()).
Handling Form Submissions
The second job of a form is to translate user-submitted data back to the properties of an object. To make this happen, the submitted data from the user must be bound to the form. Add the following functionality to your controller:
// ...

public function newAction(Request $request)
{
    // just setup a fresh $task object (remove the dummy data)
    $task = new Task();

    $form = $this->createFormBuilder($task)
        ->add('task', 'text')
        ->add('dueDate', 'date')
        ->getForm();

    if ($request->getMethod() == 'POST') {
        $form->bindRequest($request);

        if ($form->isValid()) {
            // perform some action, such as saving the task to the database

            return $this->redirect($this->generateUrl('task_success'));
        }
    }

    // ...
}
Now, when submitting the form, the controller binds the submitted data to the
form, which translates that data back to the task and dueDate properties
of the $task object. This all happens via the bindRequest() method.
Note
As soon as bindRequest() is called, the submitted data is transferred
to the underlying object immediately. This happens regardless of whether
or not the underlying data is actually valid.
This controller follows a common pattern for handling forms, and has three possible paths:
- When initially loading the page in a browser, the request method is
GETand the form is simply created and rendered; - When the user submits the form (i.e. the method is
POST) with invalid data (validation is covered in the next section), the form is bound and then rendered, this time displaying all validation errors; - When the user submits the form with valid data, the form is bound and
you have the opportunity to perform some actions using the
$taskobject (e.g. persisting it to the database) before redirecting the user to some other page (e.g. a “thank you” or “success” page).
Note
Redirecting a user after a successful form submission prevents the user from being able to hit “refresh” and re-post the data.
Form Validation
In the previous section, you learned how a form can be submitted with valid
or invalid data. In Symfony2, validation is applied to the underlying object
(e.g. Task). In other words, the question isn’t whether the “form” is
valid, but whether or not the $task object is valid after the form has
applied the submitted data to it. Calling $form->isValid() is a shortcut
that asks the $task object whether or not it has valid data.
Validation is done by adding a set of rules (called constraints) to a class. To
see this in action, add validation constraints so that the task field cannot
be empty and the dueDate field cannot be empty and must be a valid DateTime
object.
- YAML
# Acme/TaskBundle/Resources/config/validation.yml
Acme\TaskBundle\Entity\Task:
    properties:
        task:
            - NotBlank: ~
        dueDate:
            - NotBlank: ~
            - Type: \DateTime
- Annotations
// Acme/TaskBundle/Entity/Task.php use Symfony\Component\Validator\Constraints as Assert; class Task { /** * @Assert\NotBlank() */ public $task; /** * @Assert\NotBlank() * @Assert\Type("\DateTime") */ protected $dueDate; } - XML
<!-- Acme/TaskBundle/Resources/config/validation.xml -->
<class name="Acme\TaskBundle\Entity\Task">
    <property name="task">
        <constraint name="NotBlank" />
    </property>
    <property name="dueDate">
        <constraint name="NotBlank" />
        <constraint name="Type">
            <value>\DateTime</value>
        </constraint>
    </property>
</class>
- PHP
// Acme/TaskBundle/Entity/Task.php
use Symfony\Component\Validator\Mapping\ClassMetadata;
use Symfony\Component\Validator\Constraints\NotBlank;
use Symfony\Component\Validator\Constraints\Type;

class Task
{
    // ...

    public static function loadValidatorMetadata(ClassMetadata $metadata)
    {
        $metadata->addPropertyConstraint('task', new NotBlank());

        $metadata->addPropertyConstraint('dueDate', new NotBlank());
        $metadata->addPropertyConstraint('dueDate', new Type('\DateTime'));
    }
}
That’s it! If you re-submit the form with invalid data, you’ll see the corresponding errors printed out with the form.
Validation is a very powerful feature of Symfony2 and has its own dedicated chapter.
Validation Groups
Tip
If you’re not using validation groups, then you can skip this section.
If your object takes advantage of validation groups, you’ll need to specify which validation group(s) your form should use:
$form = $this->createFormBuilder($users, array(
    'validation_groups' => array('registration'),
))->add(...)
;
If you’re creating form classes (a
good practice), then you’ll need to add the following to the getDefaultOptions()
method:
public function getDefaultOptions(array $options)
{
    return array(
        'validation_groups' => array('registration')
    );
}
In both of these cases, only the registration validation group will
be used to validate the underlying object.
Groups based on Submitted Data
New in version 2.1: The ability to specify a callback or Closure in validation_groups
is new to version 2.1
If you need some advanced logic to determine the validation groups (e.g.
based on submitted data), you can set the validation_groups option
to an array callback, or a Closure:
public function getDefaultOptions(array $options)
{
    return array(
        'validation_groups' => array('Acme\\AcmeBundle\\Entity\\Client', 'determineValidationGroups'),
    );
}
This will call the static method determineValidationGroups() on the
Client class after the form is bound, but before validation is executed.
The Form object is passed as an argument to that method (see next example).
You can also define whole logic inline by using a Closure:
public function getDefaultOptions(array $options)
{
    return array(
        'validation_groups' => function(FormInterface $form) {
            $data = $form->getData();
            if (Entity\Client::TYPE_PERSON == $data->getType()) {
                return array('person')
            } else {
                return array('company');
            }
        },
    );
}
Built-in Field Types
Symfony comes standard with a large group of field types that cover all of the common form fields and data types you’ll encounter:
Field Groups
Base Fields
You can also create your own custom field types. This topic is covered in the “How to Create a Custom Form Field Type” article of the cookbook.
Field Type Options
Each field type has a number of options that can be used to configure it.
For example, the dueDate field is currently being rendered as 3 select
boxes. However, the date field can be
configured to be rendered as a single text box (where the user would enter
the date as a string in the box):
->add('dueDate', 'date', array('widget' => 'single_text'))
Each field type has a number of different options that can be passed to it. Many of these are specific to the field type and details can be found in the documentation for each type.
Field Type Guessing
Now that you’ve added validation metadata to the Task class, Symfony
already knows a bit about your fields. If you allow it, Symfony can “guess”
the type of your field and set it up for you. In this example, Symfony can
guess from the validation rules that both the task field is a normal
text field and the dueDate field is a date field:
public function newAction()
{
    $task = new Task();

    $form = $this->createFormBuilder($task)
        ->add('task')
        ->add('dueDate', null, array('widget' => 'single_text'))
        ->getForm();
}
The “guessing” is activated when you omit the second argument to the add()
method (or if you pass null to it). If you pass an options array as the
third argument (done for dueDate above), these options are applied to
the guessed field.
Caution
If your form uses a specific validation group, the field type guesser will still consider all validation constraints when guessing your field types (including constraints that are not part of the validation group(s) being used).
Field Type Options Guessing
In addition to guessing the “type” for a field, Symfony can also try to guess the correct values of a number of field options.
Tip
When these options are set, the field will be rendered with special HTML
attributes that provide for HTML5 client-side validation. However, it
doesn’t generate the equivalent server-side constraints (e.g. Assert\MaxLength).
And though you’ll need to manually add your server-side validation, these
field type options can then be guessed from that information.
required: Therequiredoption can be guessed based off of the validation rules (i.e. is the fieldNotBlankorNotNull) or the Doctrine metadata (i.e. is the fieldnullable). This is very useful, as your client-side validation will automatically match your validation rules.min_length: If the field is some sort of text field, then themin_lengthoption can be guessed from the validation constrains (ifMinLengthorMinis used) or from the Doctrine metadata (via the field’s length).max_length: Similar tomin_length, the maximum length can also be guessed.
Note
These field options are only guessed if you’re using Symfony to guess
the field type (i.e. omit or pass null as the second argument to add()).
If you’d like to change one of the guessed values, you can override it by passing the option in the options field array:
->add('task', null, array('min_length' => 4))
Rendering a Form in a Template
So far, you’ve seen how an entire form can be rendered with just one line of code. Of course, you’ll usually need much more flexibility when rendering:
- Twig
{# src/Acme/TaskBundle/Resources/views/Default/new.html.twig #}

<form action="{{ path('task_new') }}" method="post" {{ form_enctype(form) }}>
    {{ form_errors(form) }}

    {{ form_row(form.task) }}
    {{ form_row(form.dueDate) }}

    {{ form_rest(form) }}

    <input type="submit" />
</form>
- PHP
<!-- // src/Acme/TaskBundle/Resources/views/Default/newAction.html.php -->

<form action="<?php echo $view['router']->generate('task_new') ?>" method="post" <?php echo $view['form']->enctype($form) ?>>
    <?php echo $view['form']->errors($form) ?>

    <?php echo $view['form']->row($form['task']) ?>
    <?php echo $view['form']->row($form['dueDate']) ?>

    <?php echo $view['form']->rest($form) ?>

    <input type="submit" />
</form>
Let’s take a look at each part:
form_enctype(form)- If at least one field is a file upload field, this renders the obligatoryenctype="multipart/form-data";form_errors(form)- Renders any errors global to the whole form (field-specific errors are displayed next to each field);form_row(form.dueDate)- Renders the label, any errors, and the HTML form widget for the given field (e.g.dueDate) inside, by default, adivelement;form_rest(form)- Renders any fields that have not yet been rendered. It’s usually a good idea to place a call to this helper at the bottom of each form (in case you forgot to output a field or don’t want to bother manually rendering hidden fields). This helper is also useful for taking advantage of the automatic CSRF Protection.
The majority of the work is done by the form_row helper, which renders
the label, errors and HTML form widget of each field inside a div tag
by default. In the Form Theming section, you’ll learn how the form_row
output can be customized on many different levels.
Tip
You can access the current data of your form via form.vars.value:
- Twig
{{ form.vars.value.task }}
- PHP
<?php echo $view['form']->get('value')->getTask() ?>
Rendering each Field by Hand
The form_row helper is great because you can very quickly render each
field of your form (and the markup used for the “row” can be customized as
well). But since life isn’t always so simple, you can also render each field
entirely by hand. The end-product of the following is the same as when you
used the form_row helper:
- Twig
{{ form_errors(form) }}

<div>
    {{ form_label(form.task) }}
    {{ form_errors(form.task) }}
    {{ form_widget(form.task) }}
</div>

<div>
    {{ form_label(form.dueDate) }}
    {{ form_errors(form.dueDate) }}
    {{ form_widget(form.dueDate) }}
</div>

{{ form_rest(form) }}
- PHP
<?php echo $view['form']->errors($form) ?>

<div>
    <?php echo $view['form']->label($form['task']) ?>
    <?php echo $view['form']->errors($form['task']) ?>
    <?php echo $view['form']->widget($form['task']) ?>
</div>

<div>
    <?php echo $view['form']->label($form['dueDate']) ?>
    <?php echo $view['form']->errors($form['dueDate']) ?>
    <?php echo $view['form']->widget($form['dueDate']) ?>
</div>

<?php echo $view['form']->rest($form) ?>
If the auto-generated label for a field isn’t quite right, you can explicitly specify it:
- Twig
{{ form_label(form.task, 'Task Description') }}
- PHP
<?php echo $view['form']->label($form['task'], 'Task Description') ?>
Some field types have additional rendering options that can be passed
to the widget. These options are documented with each type, but one common
options is attr, which allows you to modify attributes on the form element.
The following would add the task_field class to the rendered input text
field:
- Twig
{{ form_widget(form.task, { 'attr': {'class': 'task_field'} }) }}
- PHP
<?php echo $view['form']->widget($form['task'], array(
    'attr' => array('class' => 'task_field'),
)) ?>
If you need to render form fields “by hand” then you can access individual
values for fields such as the id, name and label. For example
to get the id:
- Twig
{{ form.task.vars.id }}
- PHP
<?php echo $form['task']->get('id') ?>
To get the value used for the form field’s name attribute you need to use
the full_name value:
- Twig
{{ form.task.vars.full_name }}
- PHP
<?php echo $form['task']->get('full_name') ?>
Twig Template Function Reference
If you’re using Twig, a full reference of the form rendering functions is available in the reference manual. Read this to know everything about the helpers available and the options that can be used with each.
Creating Form Classes
As you’ve seen, a form can be created and used directly in a controller. However, a better practice is to build the form in a separate, standalone PHP class, which can then be reused anywhere in your application. Create a new class that will house the logic for building the task form:
// src/Acme/TaskBundle/Form/Type/TaskType.php

namespace Acme\TaskBundle\Form\Type;

use Symfony\Component\Form\AbstractType;
use Symfony\Component\Form\FormBuilder;

class TaskType extends AbstractType
{
    public function buildForm(FormBuilder $builder, array $options)
    {
        $builder->add('task');
        $builder->add('dueDate', null, array('widget' => 'single_text'));
    }

    public function getName()
    {
        return 'task';
    }
}
This new class contains all the directions needed to create the task form
(note that the getName() method should return a unique identifier for this
form “type”). It can be used to quickly build a form object in the controller:
// src/Acme/TaskBundle/Controller/DefaultController.php

// add this new use statement at the top of the class
use Acme\TaskBundle\Form\Type\TaskType;

public function newAction()
{
    $task = // ...
    $form = $this->createForm(new TaskType(), $task);

    // ...
}
Placing the form logic into its own class means that the form can be easily reused elsewhere in your project. This is the best way to create forms, but the choice is ultimately up to you.
Tip
When mapping forms to objects, all fields are mapped. Any fields on the form that do not exist on the mapped object will cause an exception to be thrown.
In cases where you need extra fields in the form (for example: a “do you
agree with these terms” checkbox) that will not be mapped to the underlying
object, you need to set the property_path option to false:
public function buildForm(FormBuilder $builder, array $options)
{
    $builder->add('task');
    $builder->add('dueDate', null, array('property_path' => false));
}
Additionally, if there are any fields on the form that aren’t included in
the submitted data, those fields will be explicitly set to null.
Forms and Doctrine
The goal of a form is to translate data from an object (e.g. Task) to an
HTML form and then translate user-submitted data back to the original object. As
such, the topic of persisting the Task object to the database is entirely
unrelated to the topic of forms. But, if you’ve configured the Task class
to be persisted via Doctrine (i.e. you’ve added
mapping metadata for it), then persisting
it after a form submission can be done when the form is valid:
if ($form->isValid()) {
    $em = $this->getDoctrine()->getEntityManager();
    $em->persist($task);
    $em->flush();

    return $this->redirect($this->generateUrl('task_success'));
}
If, for some reason, you don’t have access to your original $task object,
you can fetch it from the form:
$task = $form->getData();
For more information, see the Doctrine ORM chapter.
The key thing to understand is that when the form is bound, the submitted data is transferred to the underlying object immediately. If you want to persist that data, you simply need to persist the object itself (which already contains the submitted data).
Embedded Forms
Often, you’ll want to build a form that will include fields from many different
objects. For example, a registration form may contain data belonging to
a User object as well as many Address objects. Fortunately, this
is easy and natural with the form component.
Embedding a Single Object
Suppose that each Task belongs to a simple Category object. Start,
of course, by creating the Category object:
// src/Acme/TaskBundle/Entity/Category.php
namespace Acme\TaskBundle\Entity;

use Symfony\Component\Validator\Constraints as Assert;

class Category
{
    /**
     * @Assert\NotBlank()
     */
    public $name;
}
Next, add a new category property to the Task class:
// ...

class Task
{
    // ...

    /**
     * @Assert\Type(type="Acme\TaskBundle\Entity\Category")
     */
    protected $category;

    // ...

    public function getCategory()
    {
        return $this->category;
    }

    public function setCategory(Category $category = null)
    {
        $this->category = $category;
    }
}
Now that your application has been updated to reflect the new requirements,
create a form class so that a Category object can be modified by the user:
// src/Acme/TaskBundle/Form/Type/CategoryType.php
namespace Acme\TaskBundle\Form\Type;

use Symfony\Component\Form\AbstractType;
use Symfony\Component\Form\FormBuilder;

class CategoryType extends AbstractType
{
    public function buildForm(FormBuilder $builder, array $options)
    {
        $builder->add('name');
    }

    public function getDefaultOptions(array $options)
    {
        return array(
            'data_class' => 'Acme\TaskBundle\Entity\Category',
        );
    }

    public function getName()
    {
        return 'category';
    }
}
The end goal is to allow the Category of a Task to be modified right
inside the task form itself. To accomplish this, add a category field
to the TaskType object whose type is an instance of the new CategoryType
class:
public function buildForm(FormBuilder $builder, array $options)
{
    // ...

    $builder->add('category', new CategoryType());
}
The fields from CategoryType can now be rendered alongside those from
the TaskType class. Render the Category fields in the same way
as the original Task fields:
- Twig
{# ... #}

<h3>Category</h3>
<div class="category">
    {{ form_row(form.category.name) }}
</div>

{{ form_rest(form) }}
{# ... #}
- PHP
<!-- ... -->

<h3>Category</h3>
<div class="category">
    <?php echo $view['form']->row($form['category']['name']) ?>
</div>

<?php echo $view['form']->rest($form) ?>
<!-- ... -->
When the user submits the form, the submitted data for the Category fields
are used to construct an instance of Category, which is then set on the
category field of the Task instance.
The Category instance is accessible naturally via $task->getCategory()
and can be persisted to the database or used however you need.
Embedding a Collection of Forms
You can also embed a collection of forms into one form (imagine a Category
form with many Product sub-forms). This is done by using the collection
field type.
For more information see the “How to Embed a Collection of Forms” cookbook entry and the collection field type reference.
Form Theming
Every part of how a form is rendered can be customized. You’re free to change
how each form “row” renders, change the markup used to render errors, or
even customize how a textarea tag should be rendered. Nothing is off-limits,
and different customizations can be used in different places.
Symfony uses templates to render each and every part of a form, such as
label tags, input tags, error messages and everything else.
In Twig, each form “fragment” is represented by a Twig block. To customize any part of how a form renders, you just need to override the appropriate block.
In PHP, each form “fragment” is rendered via an individual template file. To customize any part of how a form renders, you just need to override the existing template by creating a new one.
To understand how this works, let’s customize the form_row fragment and
add a class attribute to the div element that surrounds each row. To
do this, create a new template file that will store the new markup:
- Twig
{# src/Acme/TaskBundle/Resources/views/Form/fields.html.twig #}

{% block field_row %}
{% spaceless %}
    <div class="form_row">
        {{ form_label(form) }}
        {{ form_errors(form) }}
        {{ form_widget(form) }}
    </div>
{% endspaceless %}
{% endblock field_row %}
- PHP
<!-- src/Acme/TaskBundle/Resources/views/Form/field_row.html.php -->

<div class="form_row">
    <?php echo $view['form']->label($form, $label) ?>
    <?php echo $view['form']->errors($form) ?>
    <?php echo $view['form']->widget($form, $parameters) ?>
</div>
The field_row form fragment is used when rendering most fields via the
form_row function. To tell the form component to use your new field_row
fragment defined above, add the following to the top of the template that
renders the form:
- Twig
{# src/Acme/TaskBundle/Resources/views/Default/new.html.twig #} {% form_theme form 'AcmeTaskBundle:Form:fields.html.twig' %} <form ...> - PHP
<!-- src/Acme/TaskBundle/Resources/views/Default/new.html.php -->

<?php $view['form']->setTheme($form, array('AcmeTaskBundle:Form')) ?>

<form ...>
The form_theme tag (in Twig) “imports” the fragments defined in the given
template and uses them when rendering the form. In other words, when the
form_row function is called later in this template, it will use the field_row
block from your custom theme (instead of the default field_row block
that ships with Symfony).
To customize any portion of a form, you just need to override the appropriate fragment. Knowing exactly which block or file to override is the subject of the next section.
For a more extensive discussion, see How to customize Form Rendering.
Form Fragment Naming
In Symfony, every part of a form that is rendered - HTML form elements, errors, labels, etc - is defined in a base theme, which is a collection of blocks in Twig and a collection of template files in PHP.
In Twig, every block needed is defined in a single template file (form_div_layout.html.twig) that lives inside the Twig Bridge. Inside this file, you can see every block needed to render a form and every default field type.
In PHP, the fragments are individual template files. By default they are located in the Resources/views/Form directory of the framework bundle (view on GitHub).
Each fragment name follows the same basic pattern and is broken up into two pieces,
separated by a single underscore character (_). A few examples are:
field_row- used byform_rowto render most fields;textarea_widget- used byform_widgetto render atextareafield type;field_errors- used byform_errorsto render errors for a field;
Each fragment follows the same basic pattern: type_part. The type portion
corresponds to the field type being rendered (e.g. textarea, checkbox,
date, etc) whereas the part portion corresponds to what is being
rendered (e.g. label, widget, errors, etc). By default, there
are 4 possible parts of a form that can be rendered:
label |
(e.g. field_label) |
renders the field’s label |
widget |
(e.g. field_widget) |
renders the field’s HTML representation |
errors |
(e.g. field_errors) |
renders the field’s errors |
row |
(e.g. field_row) |
renders the field’s entire row (label, widget & errors) |
Note
There are actually 3 other parts - rows, rest, and enctype -
but you should rarely if ever need to worry about overriding them.
By knowing the field type (e.g. textarea) and which part you want to
customize (e.g. widget), you can construct the fragment name that needs
to be overridden (e.g. textarea_widget).
Template Fragment Inheritance
In some cases, the fragment you want to customize will appear to be missing.
For example, there is no textarea_errors fragment in the default themes
provided with Symfony. So how are the errors for a textarea field rendered?
The answer is: via the field_errors fragment. When Symfony renders the errors
for a textarea type, it looks first for a textarea_errors fragment before
falling back to the field_errors fragment. Each field type has a parent
type (the parent type of textarea is field), and Symfony uses the
fragment for the parent type if the base fragment doesn’t exist.
So, to override the errors for only textarea fields, copy the
field_errors fragment, rename it to textarea_errors and customize it. To
override the default error rendering for all fields, copy and customize the
field_errors fragment directly.
Tip
The “parent” type of each field type is available in the form type reference for each field type.
Global Form Theming
In the above example, you used the form_theme helper (in Twig) to “import”
the custom form fragments into just that form. You can also tell Symfony
to import form customizations across your entire project.
Twig
To automatically include the customized blocks from the fields.html.twig
template created earlier in all templates, modify your application configuration
file:
- YAML
# app/config/config.yml

twig:
    form:
        resources:
            - 'AcmeTaskBundle:Form:fields.html.twig'
    # ...
- XML
<!-- app/config/config.xml --> <twig:config ...> <twig:form> <resource>AcmeTaskBundle:Form:fields.html.twig</resource> </twig:form> <!-- ... --> </twig:config> - PHP
// app/config/config.php

$container->loadFromExtension('twig', array(
    'form' => array('resources' => array(
        'AcmeTaskBundle:Form:fields.html.twig',
     ))
    // ...
));
Any blocks inside the fields.html.twig template are now used globally
to define form output.
PHP
To automatically include the customized templates from the Acme/TaskBundle/Resources/views/Form
directory created earlier in all templates, modify your application configuration
file:
- YAML
# app/config/config.yml

framework:
    templating:
        form:
            resources:
                - 'AcmeTaskBundle:Form'
# ...
- XML
<!-- app/config/config.xml --> <framework:config ...> <framework:templating> <framework:form> <resource>AcmeTaskBundle:Form</resource> </framework:form> </framework:templating> <!-- ... --> </framework:config> - PHP
// app/config/config.php

$container->loadFromExtension('framework', array(
    'templating' => array('form' =>
        array('resources' => array(
            'AcmeTaskBundle:Form',
     )))
    // ...
));
Any fragments inside the Acme/TaskBundle/Resources/views/Form directory
are now used globally to define form output.
CSRF Protection
CSRF - or Cross-site request forgery - is a method by which a malicious user attempts to make your legitimate users unknowingly submit data that they don’t intend to submit. Fortunately, CSRF attacks can be prevented by using a CSRF token inside your forms.
The good news is that, by default, Symfony embeds and validates CSRF tokens automatically for you. This means that you can take advantage of the CSRF protection without doing anything. In fact, every form in this chapter has taken advantage of the CSRF protection!
CSRF protection works by adding a hidden field to your form - called _token
by default - that contains a value that only you and your user knows. This
ensures that the user - not some other entity - is submitting the given data.
Symfony automatically validates the presence and accuracy of this token.
The _token field is a hidden field and will be automatically rendered
if you include the form_rest() function in your template, which ensures
that all un-rendered fields are output.
The CSRF token can be customized on a form-by-form basis. For example:
class TaskType extends AbstractType
{
    // ...

    public function getDefaultOptions(array $options)
    {
        return array(
            'data_class'      => 'Acme\TaskBundle\Entity\Task',
            'csrf_protection' => true,
            'csrf_field_name' => '_token',
            // a unique key to help generate the secret token
            'intention'       => 'task_item',
        );
    }

    // ...
}
To disable CSRF protection, set the csrf_protection option to false.
Customizations can also be made globally in your project. For more information,
see the form configuration reference
section.
Note
The intention option is optional but greatly enhances the security of
the generated token by making it different for each form.
Using a Form without a Class
In most cases, a form is tied to an object, and the fields of the form get and store their data on the properties of that object. This is exactly what you’ve seen so far in this chapter with the Task class.
But sometimes, you may just want to use a form without a class, and get back an array of the submitted data. This is actually really easy:
// make sure you've imported the Request namespace above the class
use Symfony\Component\HttpFoundation\Request
// ...

public function contactAction(Request $request)
{
    $defaultData = array('message' => 'Type your message here');
    $form = $this->createFormBuilder($defaultData)
        ->add('name', 'text')
        ->add('email', 'email')
        ->add('message', 'textarea')
        ->getForm();

        if ($request->getMethod() == 'POST') {
            $form->bindRequest($request);

            // data is an array with "name", "email", and "message" keys
            $data = $form->getData();
        }

    // ... render the form
}
By default, a form actually assumes that you want to work with arrays of data, instead of an object. There are exactly two ways that you can change this behavior and tie the form to an object instead:
- Pass an object when creating the form (as the first argument to
createFormBuilderor the second argument tocreateForm); - Declare the
data_classoption on your form.
If you don’t do either of these, then the form will return the data as
an array. In this example, since $defaultData is not an object (and
no data_class option is set), $form->getData() ultimately returns
an array.
Tip
You can also access POST values (in this case “name”) directly through the request object, like so:
$this->get('request')->request->get('name');
Be advised, however, that in most cases using the getData() method is a better choice, since it returns the data (usually an object) after it’s been transformed by the form framework.
Adding Validation
The only missing piece is validation. Usually, when you call $form->isValid(),
the object is validated by reading the constraints that you applied to that
class. But without a class, how can you add constraints to the data of your
form?
The answer is to setup the constraints yourself, and pass them into your form. The overall approach is covered a bit more in the validation chapter, but here’s a short example:
// import the namespaces above your controller class
use Symfony\Component\Validator\Constraints\Email;
use Symfony\Component\Validator\Constraints\MinLength;
use Symfony\Component\Validator\Constraints\Collection;

$collectionConstraint = new Collection(array(
    'name' => new MinLength(5),
    'email' => new Email(array('message' => 'Invalid email address')),
));

// create a form, no default values, pass in the constraint option
$form = $this->createFormBuilder(null, array(
    'validation_constraint' => $collectionConstraint,
))->add('email', 'email')
    // ...
;
Now, when you call $form->isValid(), the constraints setup here are run
against your form’s data. If you’re using a form class, override the getDefaultOptions
method to specify the option:
namespace Acme\TaskBundle\Form\Type;

use Symfony\Component\Form\AbstractType;
use Symfony\Component\Form\FormBuilder;
use Symfony\Component\Validator\Constraints\Email;
use Symfony\Component\Validator\Constraints\MinLength;
use Symfony\Component\Validator\Constraints\Collection;

class ContactType extends AbstractType
{
    // ...

    public function getDefaultOptions(array $options)
    {
        $collectionConstraint = new Collection(array(
            'name' => new MinLength(5),
            'email' => new Email(array('message' => 'Invalid email address')),
        ));

        return array('validation_constraint' => $collectionConstraint);
    }
}
Now, you have the flexibility to create forms - with validation - that return an array of data, instead of an object. In most cases, it’s better - and certainly more robust - to bind your form to an object. But for simple forms, this is a great approach.
Final Thoughts
You now know all of the building blocks necessary to build complex and
functional forms for your application. When building forms, keep in mind that
the first goal of a form is to translate data from an object (Task) to an
HTML form so that the user can modify that data. The second goal of a form is to
take the data submitted by the user and to re-apply it to the object.
There’s still much more to learn about the powerful world of forms, such as how to handle file uploads with Doctrine or how to create a form where a dynamic number of sub-forms can be added (e.g. a todo list where you can keep adding more fields via Javascript before submitting). See the cookbook for these topics. Also, be sure to lean on the field type reference documentation, which includes examples of how to use each field type and its options.