Security
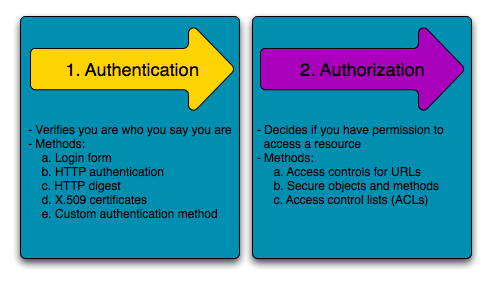
Security is a two-step process whose goal is to prevent a user from accessing a resource that he/she should not have access to.
In the first step of the process, the security system identifies who the user is by requiring the user to submit some sort of identification. This is called authentication, and it means that the system is trying to find out who you are.
Once the system knows who you are, the next step is to determine if you should have access to a given resource. This part of the process is called authorization, and it means that the system is checking to see if you have privileges to perform a certain action.
Since the best way to learn is to see an example, let’s dive right in.
Note
Symfony’s security component is available as a standalone PHP library for use inside any PHP project.
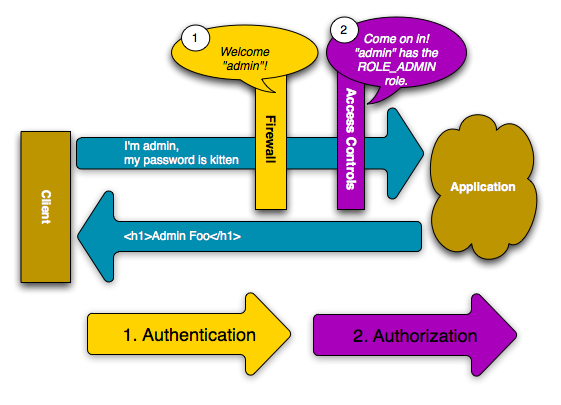
Basic Example: HTTP Authentication
The security component can be configured via your application configuration.
In fact, most standard security setups are just a matter of using the right
configuration. The following configuration tells Symfony to secure any URL
matching /admin/* and to ask the user for credentials using basic HTTP
authentication (i.e. the old-school username/password box):
- YAML
# app/config/security.yml
security:
    firewalls:
        secured_area:
            pattern:    ^/
            anonymous: ~
            http_basic:
                realm: "Secured Demo Area"

    access_control:
        - { path: ^/admin, roles: ROLE_ADMIN }

    providers:
        in_memory:
            memory:
                users:
                    ryan:  { password: ryanpass, roles: 'ROLE_USER' }
                    admin: { password: kitten, roles: 'ROLE_ADMIN' }

    encoders:
        Symfony\Component\Security\Core\User\User: plaintext
- XML
<!-- app/config/security.xml -->
<srv:container xmlns="http://symfony.com/schema/dic/security"
    xmlns:xsi="http://www.w3.org/2001/XMLSchema-instance"
    xmlns:srv="http://symfony.com/schema/dic/services"
    xsi:schemaLocation="http://symfony.com/schema/dic/services http://symfony.com/schema/dic/services/services-1.0.xsd">

    <config>
        <firewall name="secured_area" pattern="^/">
            <anonymous />
            <http-basic realm="Secured Demo Area" />
        </firewall>

        <access-control>
            <rule path="^/admin" role="ROLE_ADMIN" />
        </access-control>

        <provider name="in_memory">
            <memory>
                <user name="ryan" password="ryanpass" roles="ROLE_USER" />
                <user name="admin" password="kitten" roles="ROLE_ADMIN" />
            </memory>
        </provider>

        <encoder class="Symfony\Component\Security\Core\User\User" algorithm="plaintext" />
    </config>
</srv:container>
- PHP
// app/config/security.php
$container->loadFromExtension('security', array(
    'firewalls' => array(
        'secured_area' => array(
            'pattern' => '^/',
            'anonymous' => array(),
            'http_basic' => array(
                'realm' => 'Secured Demo Area',
            ),
        ),
    ),
    'access_control' => array(
        array('path' => '^/admin', 'role' => 'ROLE_ADMIN'),
    ),
    'providers' => array(
        'in_memory' => array(
            'memory' => array(
                'users' => array(
                    'ryan' => array('password' => 'ryanpass', 'roles' => 'ROLE_USER'),
                    'admin' => array('password' => 'kitten', 'roles' => 'ROLE_ADMIN'),
                ),
            ),
        ),
    ),
    'encoders' => array(
        'Symfony\Component\Security\Core\User\User' => 'plaintext',
    ),
));
Tip
A standard Symfony distribution separates the security configuration
into a separate file (e.g. app/config/security.yml). If you don’t
have a separate security file, you can put the configuration directly
into your main config file (e.g. app/config/config.yml).
The end result of this configuration is a fully-functional security system that looks like the following:
- There are two users in the system (
ryanandadmin); - Users authenticate themselves via the basic HTTP authentication prompt;
- Any URL matching
/admin/*is secured, and only theadminuser can access it; - All URLs not matching
/admin/*are accessible by all users (and the user is never prompted to login).
Let’s look briefly at how security works and how each part of the configuration comes into play.
How Security Works: Authentication and Authorization
Symfony’s security system works by determining who a user is (i.e. authentication) and then checking to see if that user should have access to a specific resource or URL.
Firewalls (Authentication)
When a user makes a request to a URL that’s protected by a firewall, the security system is activated. The job of the firewall is to determine whether or not the user needs to be authenticated, and if he does, to send a response back to the user initiating the authentication process.
A firewall is activated when the URL of an incoming request matches the configured
firewall’s regular expression pattern config value. In this example, the
pattern (^/) will match every incoming request. The fact that the
firewall is activated does not mean, however, that the HTTP authentication
username and password box is displayed for every URL. For example, any user
can access /foo without being prompted to authenticate.
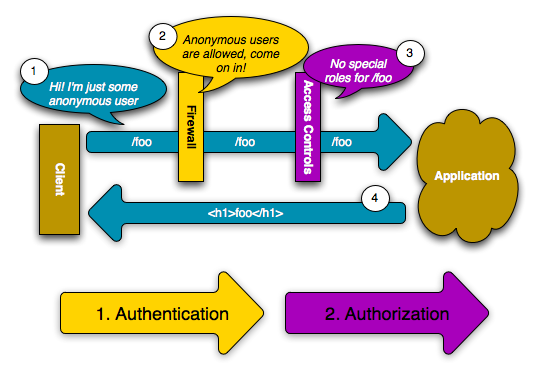
This works first because the firewall allows anonymous users via the anonymous
configuration parameter. In other words, the firewall doesn’t require the
user to fully authenticate immediately. And because no special role is
needed to access /foo (under the access_control section), the request
can be fulfilled without ever asking the user to authenticate.
If you remove the anonymous key, the firewall will always make a user
fully authenticate immediately.
Access Controls (Authorization)
If a user requests /admin/foo, however, the process behaves differently.
This is because of the access_control configuration section that says
that any URL matching the regular expression pattern ^/admin (i.e. /admin
or anything matching /admin/*) requires the ROLE_ADMIN role. Roles
are the basis for most authorization: a user can access /admin/foo only
if it has the ROLE_ADMIN role.
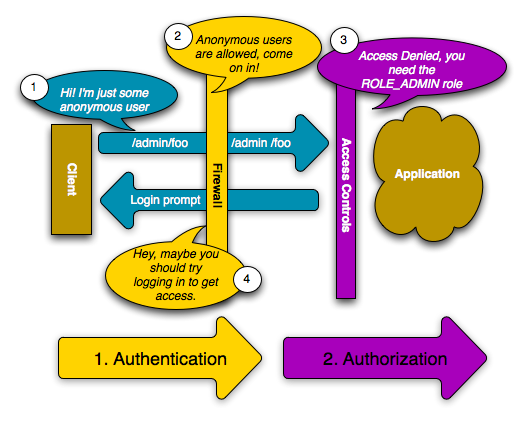
Like before, when the user originally makes the request, the firewall doesn’t
ask for any identification. However, as soon as the access control layer
denies the user access (because the anonymous user doesn’t have the ROLE_ADMIN
role), the firewall jumps into action and initiates the authentication process.
The authentication process depends on the authentication mechanism you’re
using. For example, if you’re using the form login authentication method,
the user will be redirected to the login page. If you’re using HTTP authentication,
the user will be sent an HTTP 401 response so that the user sees the username
and password box.
The user now has the opportunity to submit its credentials back to the application. If the credentials are valid, the original request can be re-tried.
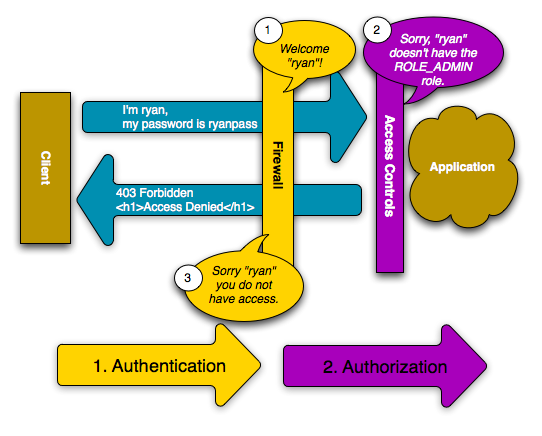
In this example, the user ryan successfully authenticates with the firewall.
But since ryan doesn’t have the ROLE_ADMIN role, he’s still denied
access to /admin/foo. Ultimately, this means that the user will see some
sort of message indicating that access has been denied.
Tip
When Symfony denies the user access, the user sees an error screen and
receives a 403 HTTP status code (Forbidden). You can customize the
access denied error screen by following the directions in the
Error Pages cookbook entry
to customize the 403 error page.
Finally, if the admin user requests /admin/foo, a similar process
takes place, except now, after being authenticated, the access control layer
will let the request pass through:
The request flow when a user requests a protected resource is straightforward, but incredibly flexible. As you’ll see later, authentication can be handled in any number of ways, including via a form login, X.509 certificate, or by authenticating the user via Twitter. Regardless of the authentication method, the request flow is always the same:
- A user accesses a protected resource;
- The application redirects the user to the login form;
- The user submits its credentials (e.g. username/password);
- The firewall authenticates the user;
- The authenticated user re-tries the original request.
Note
The exact process actually depends a little bit on which authentication
mechanism you’re using. For example, when using form login, the user
submits its credentials to one URL that processes the form (e.g. /login_check)
and then is redirected back to the originally requested URL (e.g. /admin/foo).
But with HTTP authentication, the user submits its credentials directly
to the original URL (e.g. /admin/foo) and then the page is returned
to the user in that same request (i.e. no redirect).
These types of idiosyncrasies shouldn’t cause you any problems, but they’re good to keep in mind.
Tip
You’ll also learn later how anything can be secured in Symfony2, including specific controllers, objects, or even PHP methods.
Using a Traditional Login Form
So far, you’ve seen how to blanket your application beneath a firewall and then protect access to certain areas with roles. By using HTTP Authentication, you can effortlessly tap into the native username/password box offered by all browsers. However, Symfony supports many authentication mechanisms out of the box. For details on all of them, see the Security Configuration Reference.
In this section, you’ll enhance this process by allowing the user to authenticate via a traditional HTML login form.
First, enable form login under your firewall:
- YAML
# app/config/security.yml
security:
    firewalls:
        secured_area:
            pattern:    ^/
            anonymous: ~
            form_login:
                login_path:  /login
                check_path:  /login_check
- XML
<!-- app/config/security.xml -->
<srv:container xmlns="http://symfony.com/schema/dic/security"
    xmlns:xsi="http://www.w3.org/2001/XMLSchema-instance"
    xmlns:srv="http://symfony.com/schema/dic/services"
    xsi:schemaLocation="http://symfony.com/schema/dic/services http://symfony.com/schema/dic/services/services-1.0.xsd">

    <config>
        <firewall name="secured_area" pattern="^/">
            <anonymous />
            <form-login login_path="/login" check_path="/login_check" />
        </firewall>
    </config>
</srv:container>
- PHP
// app/config/security.php
$container->loadFromExtension('security', array(
    'firewalls' => array(
        'secured_area' => array(
            'pattern' => '^/',
            'anonymous' => array(),
            'form_login' => array(
                'login_path' => '/login',
                'check_path' => '/login_check',
            ),
        ),
    ),
));
Tip
If you don’t need to customize your login_path or check_path
values (the values used here are the default values), you can shorten
your configuration:
- YAML
form_login: ~
- XML
<form-login />
- PHP
'form_login' => array(),
Now, when the security system initiates the authentication process, it will
redirect the user to the login form (/login by default). Implementing
this login form visually is your job. First, create two routes: one that
will display the login form (i.e. /login) and one that will handle the
login form submission (i.e. /login_check):
- YAML
# app/config/routing.yml
login:
    pattern:   /login
    defaults:  { _controller: AcmeSecurityBundle:Security:login }
login_check:
    pattern:   /login_check
- XML
<!-- app/config/routing.xml -->
<?xml version="1.0" encoding="UTF-8" ?>

<routes xmlns="http://symfony.com/schema/routing"
    xmlns:xsi="http://www.w3.org/2001/XMLSchema-instance"
    xsi:schemaLocation="http://symfony.com/schema/routing http://symfony.com/schema/routing/routing-1.0.xsd">

    <route id="login" pattern="/login">
        <default key="_controller">AcmeSecurityBundle:Security:login</default>
    </route>
    <route id="login_check" pattern="/login_check" />

</routes>
- PHP
// app/config/routing.php
use Symfony\Component\Routing\RouteCollection;
use Symfony\Component\Routing\Route;

$collection = new RouteCollection();
$collection->add('login', new Route('/login', array(
    '_controller' => 'AcmeDemoBundle:Security:login',
)));
$collection->add('login_check', new Route('/login_check', array()));

return $collection;
Note
You will not need to implement a controller for the /login_check
URL as the firewall will automatically catch and process any form submitted
to this URL.
New in version 2.1: As of Symfony 2.1, you must have routes configured for your login_path
(e.g. /login) and check_path (e.g. /login_check) URLs.
Notice that the name of the login route isn’t important. What’s important
is that the URL of the route (/login) matches the login_path config
value, as that’s where the security system will redirect users that need
to login.
Next, create the controller that will display the login form:
// src/Acme/SecurityBundle/Controller/Main;
namespace Acme\SecurityBundle\Controller;

use Symfony\Bundle\FrameworkBundle\Controller\Controller;
use Symfony\Component\Security\Core\SecurityContext;

class SecurityController extends Controller
{
    public function loginAction()
    {
        $request = $this->getRequest();
        $session = $request->getSession();

        // get the login error if there is one
        if ($request->attributes->has(SecurityContext::AUTHENTICATION_ERROR)) {
            $error = $request->attributes->get(SecurityContext::AUTHENTICATION_ERROR);
        } else {
            $error = $session->get(SecurityContext::AUTHENTICATION_ERROR);
        }

        return $this->render('AcmeSecurityBundle:Security:login.html.twig', array(
            // last username entered by the user
            'last_username' => $session->get(SecurityContext::LAST_USERNAME),
            'error'         => $error,
        ));
    }
}
Don’t let this controller confuse you. As you’ll see in a moment, when the user submits the form, the security system automatically handles the form submission for you. If the user had submitted an invalid username or password, this controller reads the form submission error from the security system so that it can be displayed back to the user.
In other words, your job is to display the login form and any login errors that may have occurred, but the security system itself takes care of checking the submitted username and password and authenticating the user.
Finally, create the corresponding template:
- Twig
{# src/Acme/SecurityBundle/Resources/views/Security/login.html.twig #}
{% if error %}
    <div>{{ error.message }}</div>
{% endif %}

<form action="{{ path('login_check') }}" method="post">
    <label for="username">Username:</label>
    <input type="text" id="username" name="_username" value="{{ last_username }}" />

    <label for="password">Password:</label>
    <input type="password" id="password" name="_password" />

    {#
        If you want to control the URL the user is redirected to on success (more details below)
        <input type="hidden" name="_target_path" value="/account" />
    #}

    <input type="submit" name="login" />
</form>
- PHP
<?php // src/Acme/SecurityBundle/Resources/views/Security/login.html.php ?>
<?php if ($error): ?>
    <div><?php echo $error->getMessage() ?></div>
<?php endif; ?>

<form action="<?php echo $view['router']->generate('login_check') ?>" method="post">
    <label for="username">Username:</label>
    <input type="text" id="username" name="_username" value="<?php echo $last_username ?>" />

    <label for="password">Password:</label>
    <input type="password" id="password" name="_password" />

    <!--
        If you want to control the URL the user is redirected to on success (more details below)
        <input type="hidden" name="_target_path" value="/account" />
    -->

    <input type="submit" name="login" />
</form>
Tip
The error variable passed into the template is an instance of
Symfony\Component\Security\Core\Exception\AuthenticationException.
It may contain more information - or even sensitive information - about
the authentication failure, so use it wisely!
The form has very few requirements. First, by submitting the form to /login_check
(via the login_check route), the security system will intercept the form
submission and process the form for you automatically. Second, the security
system expects the submitted fields to be called _username and _password
(these field names can be configured).
And that’s it! When you submit the form, the security system will automatically check the user’s credentials and either authenticate the user or send the user back to the login form where the error can be displayed.
Let’s review the whole process:
- The user tries to access a resource that is protected;
- The firewall initiates the authentication process by redirecting the
user to the login form (
/login); - The
/loginpage renders login form via the route and controller created in this example; - The user submits the login form to
/login_check; - The security system intercepts the request, checks the user’s submitted credentials, authenticates the user if they are correct, and sends the user back to the login form if they are not.
By default, if the submitted credentials are correct, the user will be redirected
to the original page that was requested (e.g. /admin/foo). If the user
originally went straight to the login page, he’ll be redirected to the homepage.
This can be highly customized, allowing you to, for example, redirect the
user to a specific URL.
For more details on this and how to customize the form login process in general, see How to customize your Form Login.
Authorization
The first step in security is always authentication: the process of verifying who the user is. With Symfony, authentication can be done in any way - via a form login, basic HTTP Authentication, or even via Facebook.
Once the user has been authenticated, authorization begins. Authorization provides a standard and powerful way to decide if a user can access any resource (a URL, a model object, a method call, ...). This works by assigning specific roles to each user, and then requiring different roles for different resources.
The process of authorization has two different sides:
- The user has a specific set of roles;
- A resource requires a specific role in order to be accessed.
In this section, you’ll focus on how to secure different resources (e.g. URLs, method calls, etc) with different roles. Later, you’ll learn more about how roles are created and assigned to users.
Securing Specific URL Patterns
The most basic way to secure part of your application is to secure an entire
URL pattern. You’ve seen this already in the first example of this chapter,
where anything matching the regular expression pattern ^/admin requires
the ROLE_ADMIN role.
You can define as many URL patterns as you need - each is a regular expression.
- YAML
# app/config/security.yml
security:
    # ...
    access_control:
        - { path: ^/admin/users, roles: ROLE_SUPER_ADMIN }
        - { path: ^/admin, roles: ROLE_ADMIN }
- XML
<!-- app/config/security.xml -->
<config>
    <!-- ... -->
    <rule path="^/admin/users" role="ROLE_SUPER_ADMIN" />
    <rule path="^/admin" role="ROLE_ADMIN" />
</config>
- PHP
// app/config/security.php
$container->loadFromExtension('security', array(
    // ...
    'access_control' => array(
        array('path' => '^/admin/users', 'role' => 'ROLE_SUPER_ADMIN'),
        array('path' => '^/admin', 'role' => 'ROLE_ADMIN'),
    ),
));
Tip
Prepending the path with ^ ensures that only URLs beginning with
the pattern are matched. For example, a path of simply /admin (without
the ^) would correctly match /admin/foo but would also match URLs
like /foo/admin.
For each incoming request, Symfony2 tries to find a matching access control
rule (the first one wins). If the user isn’t authenticated yet, the authentication
process is initiated (i.e. the user is given a chance to login). However,
if the user is authenticated but doesn’t have the required role, an
Symfony\Component\Security\Core\Exception\AccessDeniedException
exception is thrown, which you can handle and turn into a nice “access denied”
error page for the user. See How to customize Error Pages for
more information.
Since Symfony uses the first access control rule it matches, a URL like /admin/users/new
will match the first rule and require only the ROLE_SUPER_ADMIN role.
Any URL like /admin/blog will match the second rule and require ROLE_ADMIN.
Securing by IP
Certain situations may arise when you may need to restrict access to a given route based on IP. This is particularly relevant in the case of Edge Side Includes (ESI), for example, which utilize a route named “_internal”. When ESI is used, the _internal route is required by the gateway cache to enable different caching options for subsections within a given page. This route comes with the ^/_internal prefix by default in the standard edition (assuming you’ve uncommented those lines from the routing file).
Here is an example of how you might secure this route from outside access:
- YAML
# app/config/security.yml
security:
    # ...
    access_control:
        - { path: ^/_internal, roles: IS_AUTHENTICATED_ANONYMOUSLY, ip: 127.0.0.1 }
- XML
<access-control>
    <rule path="^/_internal" role="IS_AUTHENTICATED_ANONYMOUSLY" ip="127.0.0.1" />
</access-control>
- PHP
'access_control' => array(
    array('path' => '^/_internal', 'role' => 'IS_AUTHENTICATED_ANONYMOUSLY', 'ip' => '127.0.0.1'),
),
Securing by Channel
Much like securing based on IP, requiring the use of SSL is as simple as adding a new access_control entry:
- YAML
# app/config/security.yml
security:
    # ...
    access_control:
        - { path: ^/cart/checkout, roles: IS_AUTHENTICATED_ANONYMOUSLY, requires_channel: https }
- XML
<access-control>
    <rule path="^/cart/checkout" role="IS_AUTHENTICATED_ANONYMOUSLY" requires_channel="https" />
</access-control>
- PHP
'access_control' => array(
    array('path' => '^/cart/checkout', 'role' => 'IS_AUTHENTICATED_ANONYMOUSLY', 'requires_channel' => 'https'),
),
Securing a Controller
Protecting your application based on URL patterns is easy, but may not be fine-grained enough in certain cases. When necessary, you can easily force authorization from inside a controller:
use Symfony\Component\Security\Core\Exception\AccessDeniedException;
// ...

public function helloAction($name)
{
    if (false === $this->get('security.context')->isGranted('ROLE_ADMIN')) {
        throw new AccessDeniedException();
    }

    // ...
}
You can also choose to install and use the optional JMSSecurityExtraBundle,
which can secure your controller using annotations:
use JMS\SecurityExtraBundle\Annotation\Secure;

/**
 * @Secure(roles="ROLE_ADMIN")
 */
public function helloAction($name)
{
    // ...
}
For more information, see the JMSSecurityExtraBundle documentation. If you’re using Symfony’s Standard Distribution, this bundle is available by default. If not, you can easily download and install it.
Securing other Services
In fact, anything in Symfony can be protected using a strategy similar to the one seen in the previous section. For example, suppose you have a service (i.e. a PHP class) whose job is to send emails from one user to another. You can restrict use of this class - no matter where it’s being used from - to users that have a specific role.
For more information on how you can use the security component to secure different services and methods in your application, see How to secure any Service or Method in your Application.
Access Control Lists (ACLs): Securing Individual Database Objects
Imagine you are designing a blog system where your users can comment on your posts. Now, you want a user to be able to edit his own comments, but not those of other users. Also, as the admin user, you yourself want to be able to edit all comments.
The security component comes with an optional access control list (ACL) system that you can use when you need to control access to individual instances of an object in your system. Without ACL, you can secure your system so that only certain users can edit blog comments in general. But with ACL, you can restrict or allow access on a comment-by-comment basis.
For more information, see the cookbook article: Access Control Lists (ACLs).
Users
In the previous sections, you learned how you can protect different resources by requiring a set of roles for a resource. In this section we’ll explore the other side of authorization: users.
Where do Users come from? (User Providers)
During authentication, the user submits a set of credentials (usually a username and password). The job of the authentication system is to match those credentials against some pool of users. So where does this list of users come from?
In Symfony2, users can come from anywhere - a configuration file, a database table, a web service, or anything else you can dream up. Anything that provides one or more users to the authentication system is known as a “user provider”. Symfony2 comes standard with the two most common user providers: one that loads users from a configuration file and one that loads users from a database table.
Specifying Users in a Configuration File
The easiest way to specify your users is directly in a configuration file. In fact, you’ve seen this already in the example in this chapter.
- YAML
# app/config/security.yml
security:
    # ...
    providers:
        default_provider:
            memory:
                users:
                    ryan:  { password: ryanpass, roles: 'ROLE_USER' }
                    admin: { password: kitten, roles: 'ROLE_ADMIN' }
- XML
<!-- app/config/security.xml -->
<config>
    <!-- ... -->
    <provider name="default_provider">
        <memory>
            <user name="ryan" password="ryanpass" roles="ROLE_USER" />
            <user name="admin" password="kitten" roles="ROLE_ADMIN" />
        </memory>
    </provider>
</config>
- PHP
// app/config/security.php
$container->loadFromExtension('security', array(
    // ...
    'providers' => array(
        'default_provider' => array(
            'memory' => array(
                'users' => array(
                    'ryan' => array('password' => 'ryanpass', 'roles' => 'ROLE_USER'),
                    'admin' => array('password' => 'kitten', 'roles' => 'ROLE_ADMIN'),
                ),
            ),
        ),
    ),
));
This user provider is called the “in-memory” user provider, since the users
aren’t stored anywhere in a database. The actual user object is provided
by Symfony (Symfony\Component\Security\Core\User\User).
Tip
Any user provider can load users directly from configuration by specifying
the users configuration parameter and listing the users beneath it.
Caution
If your username is completely numeric (e.g. 77) or contains a dash
(e.g. user-name), you should use that alternative syntax when specifying
users in YAML:
users:
    - { name: 77, password: pass, roles: 'ROLE_USER' }
    - { name: user-name, password: pass, roles: 'ROLE_USER' }
For smaller sites, this method is quick and easy to setup. For more complex systems, you’ll want to load your users from the database.
Loading Users from the Database
If you’d like to load your users via the Doctrine ORM, you can easily do
this by creating a User class and configuring the entity provider.
With this approach, you’ll first create your own User class, which will
be stored in the database.
// src/Acme/UserBundle/Entity/User.php
namespace Acme\UserBundle\Entity;

use Symfony\Component\Security\Core\User\UserInterface;
use Doctrine\ORM\Mapping as ORM;

/**
 * @ORM\Entity
 */
class User implements UserInterface
{
    /**
     * @ORM\Column(type="string", length="255")
     */
    protected $username;

    // ...
}
As far as the security system is concerned, the only requirement for your
custom user class is that it implements the Symfony\Component\Security\Core\User\UserInterface
interface. This means that your concept of a “user” can be anything, as long
as it implements this interface.
New in version 2.1: In Symfony 2.1, the equals method was removed from UserInterface.
If you need to override the default implementation of comparison logic,
implement the new Symfony\Component\Security\Core\User\EquatableInterface
interface.
Note
The user object will be serialized and saved in the session during requests,
therefore it is recommended that you implement the Serializable interface
in your user object. This is especially important if your User class
has a parent class with private properties.
Next, configure an entity user provider, and point it to your User
class:
- YAML
# app/config/security.yml
security:
    providers:
        main:
            entity: { class: Acme\UserBundle\Entity\User, property: username }
- XML
<!-- app/config/security.xml -->
<config>
    <provider name="main">
        <entity class="Acme\UserBundle\Entity\User" property="username" />
    </provider>
</config>
- PHP
// app/config/security.php
$container->loadFromExtension('security', array(
    'providers' => array(
        'main' => array(
            'entity' => array('class' => 'Acme\UserBundle\Entity\User', 'property' => 'username'),
        ),
    ),
));
With the introduction of this new provider, the authentication system will
attempt to load a User object from the database by using the username
field of that class.
Note
This example is just meant to show you the basic idea behind the entity
provider. For a full working example, see How to load Security Users from the Database (the Entity Provider).
For more information on creating your own custom provider (e.g. if you needed to load users via a web service), see How to create a custom User Provider.
Encoding the User’s Password
So far, for simplicity, all the examples have stored the users’ passwords
in plain text (whether those users are stored in a configuration file or in
a database somewhere). Of course, in a real application, you’ll want to encode
your users’ passwords for security reasons. This is easily accomplished by
mapping your User class to one of several built-in “encoders”. For example,
to store your users in memory, but obscure their passwords via sha1,
do the following:
- YAML
# app/config/security.yml
security:
    # ...
    providers:
        in_memory:
            memory:
                users:
                    ryan:  { password: bb87a29949f3a1ee0559f8a57357487151281386, roles: 'ROLE_USER' }
                    admin: { password: 74913f5cd5f61ec0bcfdb775414c2fb3d161b620, roles: 'ROLE_ADMIN' }

    encoders:
        Symfony\Component\Security\Core\User\User:
            algorithm:   sha1
            iterations: 1
            encode_as_base64: false
- XML
<!-- app/config/security.xml -->
<config>
    <!-- ... -->
    <provider name="in_memory">
        <memory>
            <user name="ryan" password="bb87a29949f3a1ee0559f8a57357487151281386" roles="ROLE_USER" />
            <user name="admin" password="74913f5cd5f61ec0bcfdb775414c2fb3d161b620" roles="ROLE_ADMIN" />
        </memory>
    </provider>

    <encoder class="Symfony\Component\Security\Core\User\User" algorithm="sha1" iterations="1" encode_as_base64="false" />
</config>
- PHP
// app/config/security.php
$container->loadFromExtension('security', array(
    // ...
    'providers' => array(
        'in_memory' => array(
            'memory' => array(
                'users' => array(
                    'ryan' => array('password' => 'bb87a29949f3a1ee0559f8a57357487151281386', 'roles' => 'ROLE_USER'),
                    'admin' => array('password' => '74913f5cd5f61ec0bcfdb775414c2fb3d161b620', 'roles' => 'ROLE_ADMIN'),
                ),
            ),
        ),
    ),
    'encoders' => array(
        'Symfony\Component\Security\Core\User\User' => array(
            'algorithm'         => 'sha1',
            'iterations'        => 1,
            'encode_as_base64'  => false,
        ),
    ),
));
By setting the iterations to 1 and the encode_as_base64 to false,
the password is simply run through the sha1 algorithm one time and without
any extra encoding. You can now calculate the hashed password either programmatically
(e.g. hash('sha1', 'ryanpass')) or via some online tool like functions-online.com
If you’re creating your users dynamically (and storing them in a database),
you can use even tougher hashing algorithms and then rely on an actual password
encoder object to help you encode passwords. For example, suppose your User
object is Acme\UserBundle\Entity\User (like in the above example). First,
configure the encoder for that user:
- YAML
# app/config/security.yml
security:
    # ...

    encoders:
        Acme\UserBundle\Entity\User: sha512
- XML
<!-- app/config/security.xml -->
<config>
    <!-- ... -->

    <encoder class="Acme\UserBundle\Entity\User" algorithm="sha512" />
</config>
- PHP
// app/config/security.php
$container->loadFromExtension('security', array(
    // ...

    'encoders' => array(
        'Acme\UserBundle\Entity\User' => 'sha512',
    ),
));
In this case, you’re using the stronger sha512 algorithm. Also, since
you’ve simply specified the algorithm (sha512) as a string, the system
will default to hashing your password 5000 times in a row and then encoding
it as base64. In other words, the password has been greatly obfuscated so
that the hashed password can’t be decoded (i.e. you can’t determine the password
from the hashed password).
If you have some sort of registration form for users, you’ll need to be able to determine the hashed password so that you can set it on your user. No matter what algorithm you configure for your user object, the hashed password can always be determined in the following way from a controller:
$factory = $this->get('security.encoder_factory');
$user = new Acme\UserBundle\Entity\User();

$encoder = $factory->getEncoder($user);
$password = $encoder->encodePassword('ryanpass', $user->getSalt());
$user->setPassword($password);
Retrieving the User Object
After authentication, the User object of the current user can be accessed
via the security.context service. From inside a controller, this will
look like:
public function indexAction()
{
    $user = $this->get('security.context')->getToken()->getUser();
}
In a controller this can be shortcut to:
public function indexAction()
{
    $user = $this->getUser();
}
Note
Anonymous users are technically authenticated, meaning that the isAuthenticated()
method of an anonymous user object will return true. To check if your
user is actually authenticated, check for the IS_AUTHENTICATED_FULLY
role.
In a Twig Template this object can be accessed via the app.user key,
which calls the :method:`GlobalVariables::getUser()<Symfony\\Bundle\\FrameworkBundle\\Templating\\GlobalVariables::getUser>`
method:
- Twig
<p>Username: {{ app.user.username }}</p>
Using Multiple User Providers
Each authentication mechanism (e.g. HTTP Authentication, form login, etc) uses exactly one user provider, and will use the first declared user provider by default. But what if you want to specify a few users via configuration and the rest of your users in the database? This is possible by creating a new provider that chains the two together:
- YAML
# app/config/security.yml
security:
    providers:
        chain_provider:
            chain:
                providers: [in_memory, user_db]
        in_memory:
            users:
                foo: { password: test }
        user_db:
            entity: { class: Acme\UserBundle\Entity\User, property: username }
- XML
<!-- app/config/security.xml -->
<config>
    <provider name="chain_provider">
        <chain>
            <provider>in_memory</provider>
            <provider>user_db</provider>
        </chain>
    </provider>
    <provider name="in_memory">
        <user name="foo" password="test" />
    </provider>
    <provider name="user_db">
        <entity class="Acme\UserBundle\Entity\User" property="username" />
    </provider>
</config>
- PHP
// app/config/security.php
$container->loadFromExtension('security', array(
    'providers' => array(
        'chain_provider' => array(
            'chain' => array(
                'providers' => array('in_memory', 'user_db'),
            ),
        ),
        'in_memory' => array(
            'users' => array(
                'foo' => array('password' => 'test'),
            ),
        ),
        'user_db' => array(
            'entity' => array('class' => 'Acme\UserBundle\Entity\User', 'property' => 'username'),
        ),
    ),
));
Now, all authentication mechanisms will use the chain_provider, since
it’s the first specified. The chain_provider will, in turn, try to load
the user from both the in_memory and user_db providers.
Tip
If you have no reasons to separate your in_memory users from your
user_db users, you can accomplish this even more easily by combining
the two sources into a single provider:
- YAML
# app/config/security.yml
security:
    providers:
        main_provider:
            memory:
                users:
                    foo: { password: test }
            entity:
                class: Acme\UserBundle\Entity\User,
                property: username
- XML
<!-- app/config/security.xml -->
<config>
    <provider name=="main_provider">
        <memory>
            <user name="foo" password="test" />
        </memory>
        <entity class="Acme\UserBundle\Entity\User" property="username" />
    </provider>
</config>
- PHP
// app/config/security.php
$container->loadFromExtension('security', array(
    'providers' => array(
        'main_provider' => array(
            'memory' => array(
                'users' => array(
                    'foo' => array('password' => 'test'),
                ),
            ),
            'entity' => array('class' => 'Acme\UserBundle\Entity\User', 'property' => 'username'),
        ),
    ),
));
You can also configure the firewall or individual authentication mechanisms to use a specific provider. Again, unless a provider is specified explicitly, the first provider is always used:
- YAML
# app/config/security.yml
security:
    firewalls:
        secured_area:
            # ...
            provider: user_db
            http_basic:
                realm: "Secured Demo Area"
                provider: in_memory
            form_login: ~
- XML
<!-- app/config/security.xml -->
<config>
    <firewall name="secured_area" pattern="^/" provider="user_db">
        <!-- ... -->
        <http-basic realm="Secured Demo Area" provider="in_memory" />
        <form-login />
    </firewall>
</config>
- PHP
// app/config/security.php
$container->loadFromExtension('security', array(
    'firewalls' => array(
        'secured_area' => array(
            // ...
            'provider' => 'user_db',
            'http_basic' => array(
                // ...
                'provider' => 'in_memory',
            ),
            'form_login' => array(),
        ),
    ),
));
In this example, if a user tries to login via HTTP authentication, the authentication
system will use the in_memory user provider. But if the user tries to
login via the form login, the user_db provider will be used (since it’s
the default for the firewall as a whole).
For more information about user provider and firewall configuration, see the Security Configuration Reference.
Roles
The idea of a “role” is key to the authorization process. Each user is assigned a set of roles and then each resource requires one or more roles. If the user has the required roles, access is granted. Otherwise access is denied.
Roles are pretty simple, and are basically strings that you can invent and
use as needed (though roles are objects internally). For example, if you
need to start limiting access to the blog admin section of your website,
you could protect that section using a ROLE_BLOG_ADMIN role. This role
doesn’t need to be defined anywhere - you can just start using it.
Note
All roles must begin with the ROLE_ prefix to be managed by
Symfony2. If you define your own roles with a dedicated Role class
(more advanced), don’t use the ROLE_ prefix.
Hierarchical Roles
Instead of associating many roles to users, you can define role inheritance rules by creating a role hierarchy:
- YAML
# app/config/security.yml
security:
    role_hierarchy:
        ROLE_ADMIN:       ROLE_USER
        ROLE_SUPER_ADMIN: [ROLE_ADMIN, ROLE_ALLOWED_TO_SWITCH]
- XML
<!-- app/config/security.xml -->
<config>
    <role id="ROLE_ADMIN">ROLE_USER</role>
    <role id="ROLE_SUPER_ADMIN">ROLE_ADMIN, ROLE_ALLOWED_TO_SWITCH</role>
</config>
- PHP
// app/config/security.php
$container->loadFromExtension('security', array(
    'role_hierarchy' => array(
        'ROLE_ADMIN'       => 'ROLE_USER',
        'ROLE_SUPER_ADMIN' => array('ROLE_ADMIN', 'ROLE_ALLOWED_TO_SWITCH'),
    ),
));
In the above configuration, users with ROLE_ADMIN role will also have the
ROLE_USER role. The ROLE_SUPER_ADMIN role has ROLE_ADMIN, ROLE_ALLOWED_TO_SWITCH
and ROLE_USER (inherited from ROLE_ADMIN).
Logging Out
Usually, you’ll also want your users to be able to log out. Fortunately,
the firewall can handle this automatically for you when you activate the
logout config parameter:
- YAML
# app/config/security.yml
security:
    firewalls:
        secured_area:
            # ...
            logout:
                path:   /logout
                target: /
    # ...
- XML
<!-- app/config/security.xml -->
<config>
    <firewall name="secured_area" pattern="^/">
        <!-- ... -->
        <logout path="/logout" target="/" />
    </firewall>
    <!-- ... -->
</config>
- PHP
// app/config/security.php
$container->loadFromExtension('security', array(
    'firewalls' => array(
        'secured_area' => array(
            // ...
            'logout' => array('path' => 'logout', 'target' => '/'),
        ),
    ),
    // ...
));
Once this is configured under your firewall, sending a user to /logout
(or whatever you configure the path to be), will un-authenticate the
current user. The user will then be sent to the homepage (the value defined
by the target parameter). Both the path and target config parameters
default to what’s specified here. In other words, unless you need to customize
them, you can omit them entirely and shorten your configuration:
- YAML
logout: ~
- XML
<logout />
- PHP
'logout' => array(),
Note that you will not need to implement a controller for the /logout
URL as the firewall takes care of everything. You may, however, want to create
a route so that you can use it to generate the URL:
- YAML
# app/config/routing.yml
logout:
    pattern:   /logout
- XML
<!-- app/config/routing.xml -->
<?xml version="1.0" encoding="UTF-8" ?>

<routes xmlns="http://symfony.com/schema/routing"
    xmlns:xsi="http://www.w3.org/2001/XMLSchema-instance"
    xsi:schemaLocation="http://symfony.com/schema/routing http://symfony.com/schema/routing/routing-1.0.xsd">

    <route id="logout" pattern="/logout" />

</routes>
- PHP
// app/config/routing.php
use Symfony\Component\Routing\RouteCollection;
use Symfony\Component\Routing\Route;

$collection = new RouteCollection();
$collection->add('logout', new Route('/logout', array()));

return $collection;
Once the user has been logged out, he will be redirected to whatever path
is defined by the target parameter above (e.g. the homepage). For
more information on configuring the logout, see the
Security Configuration Reference.
Access Control in Templates
If you want to check if the current user has a role inside a template, use the built-in helper function:
- Twig
{% if is_granted('ROLE_ADMIN') %}
    <a href="...">Delete</a>
{% endif %}
- PHP
<?php if ($view['security']->isGranted('ROLE_ADMIN')): ?>
    <a href="...">Delete</a>
<?php endif; ?>
Note
If you use this function and are not at a URL where there is a firewall active, an exception will be thrown. Again, it’s almost always a good idea to have a main firewall that covers all URLs (as has been shown in this chapter).
Access Control in Controllers
If you want to check if the current user has a role in your controller, use
the isGranted method of the security context:
public function indexAction()
{
    // show different content to admin users
    if ($this->get('security.context')->isGranted('ROLE_ADMIN')) {
        // Load admin content here
    }
    // load other regular content here
}
Note
A firewall must be active or an exception will be thrown when the isGranted
method is called. See the note above about templates for more details.
Impersonating a User
Sometimes, it’s useful to be able to switch from one user to another without
having to logout and login again (for instance when you are debugging or trying
to understand a bug a user sees that you can’t reproduce). This can be easily
done by activating the switch_user firewall listener:
- YAML
# app/config/security.yml
security:
    firewalls:
        main:
            # ...
            switch_user: true
- XML
<!-- app/config/security.xml -->
<config>
    <firewall>
        <!-- ... -->
        <switch-user />
    </firewall>
</config>
- PHP
// app/config/security.php
$container->loadFromExtension('security', array(
    'firewalls' => array(
        'main'=> array(
            // ...
            'switch_user' => true
        ),
    ),
));
To switch to another user, just add a query string with the _switch_user
parameter and the username as the value to the current URL:
To switch back to the original user, use the special _exit username:
Of course, this feature needs to be made available to a small group of users.
By default, access is restricted to users having the ROLE_ALLOWED_TO_SWITCH
role. The name of this role can be modified via the role setting. For
extra security, you can also change the query parameter name via the parameter
setting:
- YAML
# app/config/security.yml
security:
    firewalls:
        main:
            // ...
            switch_user: { role: ROLE_ADMIN, parameter: _want_to_be_this_user }
- XML
<!-- app/config/security.xml -->
<config>
    <firewall>
        <!-- ... -->
        <switch-user role="ROLE_ADMIN" parameter="_want_to_be_this_user" />
    </firewall>
</config>
- PHP
// app/config/security.php
$container->loadFromExtension('security', array(
    'firewalls' => array(
        'main'=> array(
            // ...
            'switch_user' => array('role' => 'ROLE_ADMIN', 'parameter' => '_want_to_be_this_user'),
        ),
    ),
));
Stateless Authentication
By default, Symfony2 relies on a cookie (the Session) to persist the security context of the user. But if you use certificates or HTTP authentication for instance, persistence is not needed as credentials are available for each request. In that case, and if you don’t need to store anything else between requests, you can activate the stateless authentication (which means that no cookie will be ever created by Symfony2):
- YAML
# app/config/security.yml
security:
    firewalls:
        main:
            http_basic: ~
            stateless:  true
- XML
<!-- app/config/security.xml -->
<config>
    <firewall stateless="true">
        <http-basic />
    </firewall>
</config>
- PHP
// app/config/security.php
$container->loadFromExtension('security', array(
    'firewalls' => array(
        'main' => array('http_basic' => array(), 'stateless' => true),
    ),
));
Note
If you use a form login, Symfony2 will create a cookie even if you set
stateless to true.
Final Words
Security can be a deep and complex issue to solve correctly in your application. Fortunately, Symfony’s security component follows a well-proven security model based around authentication and authorization. Authentication, which always happens first, is handled by a firewall whose job is to determine the identity of the user through several different methods (e.g. HTTP authentication, login form, etc). In the cookbook, you’ll find examples of other methods for handling authentication, including how to implement a “remember me” cookie functionality.
Once a user is authenticated, the authorization layer can determine whether or not the user should have access to a specific resource. Most commonly, roles are applied to URLs, classes or methods and if the current user doesn’t have that role, access is denied. The authorization layer, however, is much deeper, and follows a system of “voting” so that multiple parties can determine if the current user should have access to a given resource. Find out more about this and other topics in the cookbook.